Utilizing nature to create a zero impact, zero waste, carbon positive, completely self sustainable eco system,
... producing fresh organic fruits , vegetables, fish, crayfish & energy - In our backyard.

Welcome to our adventure ...

Aquaponics is a natural eco-system, which organically produces vegetables, fish & crayfish. It is the integration of fish cultivation, aquaculture, with hydroponic plant production.

Fish wastes are 'filtered' by natural bacteria producing a rich nutrient source for the plants. The plants utilize these nutrients for growth, thus purifying the water to then be returned to the fish. This continuous cycle is what happens in a nature.

Aquaponics has many advantages including, requiring much less space than traditional farming methods, highly efficient food productive method - potentially higher than hydoponics, with zero environmental impact.

- No chemical fertiliser's, pesticides, insecticides or soil conditioners are used.

- Zero water waste. All water is constantly purified by the plants and recirculated back to the fish.

- 100% of all nutrients are used, creating two crops from one nutrient source - the fish food.

- 100% of wastes generated are utilized on site through filters that feed the plants. Worm composts & Black Soldier Fly's are utilized for all vegetable off cuts and house hold waste's, creating natural healthy fish food source's. Worm & BSF castings being used for enhancing soil condition.

- As a source of protein, fish are the most efficient convertors out of all our farmed animals, achieving feed to flesh conversion efficiency close to 100%.

Aquaponics is a 100% natural eco-system.

PVA has also incorporated a totally off grid solar power installation, supplying power for the system, work shed and computers.

Shade House & Chicken Enclosure

We have finally finished the shade house.
A friend gave us some old shade cloth he had replaced in his nursery as well as some tips on how to tie it to the frames to reduce possible damage during bad weather.
The secret was to tie the wire to the pole framework, not tie the shade cloth. So I spent a day threading some heavy wire on the outer edges to make a seam... that was not much fun but im glad its done now.


We have also just about finished the chicken enclosure. Never personally having had chickens before, the design was left up to Peter & his wife Sue. You can also see Peter's DIY auto chook feeder attached to the fence.
 

 The complete system as it stands January 15th.


I was a bit concerned about the access for bees, so I used bird netting for the front and 1 side. The other side shares a wall with the chicken enclosure.
Another concern is that the shade cloth might be too sun light restrictive during winter, if so, I will remove it for winter and replace it with a bird netting roof.
I love to share, but the King Parrots dont understand that concept and they just Love green tomatoes.

All in all, im pretty happy with the finished shade house.

New Years Eve Aquaponics Seafood Feast 2012

Hi,

Well, this is the day ive been waiting for ! The ultimate test of taste. To savor some of the spoils of 12 months effort. It was going to be a busy day.

50kgs of ice arrived at 9am, it was time to begin the final harvest.

I made up an ice slurry in the tub containing the purged crayfish, after I had drained their water, and placed it near the IBC containing the fish. I had the fish running on a separate pond filter that I had very professionally installed on top for easy removal.


16 silver perch were added into the ice slurry already containing the crayfish, it was soon time to begin processing the harvest.


Processing the harvest was a bit of a task, as per previous post. It was now time to dress & wrap our lovely fresh perch & crays. I had made a fish dressing & crayfish marinade the previous night.
Yummmo !


After cleaning up I headed back out to the system & gardens and grabbed a heap more fresh veggies to make salads for our feast.


Another moment in time I was greatly looking forward to, it was time to pre heat the Rocket BBQ to bake our fish.


I have now used the RBBQ many times including a small baked dinner. I was feeling confidant and getting use to how much fuel was needed to keep a nice 200c.

Pop the fish in and close the lid, give them a flip in 15mins and leave them for another 15mins in the rocket oven. Time for the marinated red claws.


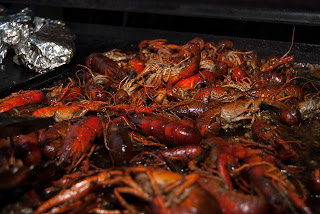
Mate, this is smelling awesome by now I have to tell you! Look at those colours!


Not much left to do now except plate up and enjoy !


After a total taste sensation packed meal it was time to pop the pie in the rocket oven.


Serve it with custard & cream and toast a Happy New Year to All !

I am truly blessed by all the beautiful people in my life and am grateful for the opportunities & experiences of 2012.

May you all have a safe, fun, loving, learning, sharing & caring 2013 !!

Aquaponic & Garden Ingredients used to create our feast -
Silver Perch, Red Claw Crayfish, Leeks, Spring Onions, Shallots, Ginger, Turmeric, Galangal, Mini Basil, 4 types of chilli's - Hungarian Yellow, Black Velvet, Birds Eye & Green Cayenne, Yellow Squash, Zucchini, Gre
en & Red Capsicum, Celery, Cherry & Roma Tomatoes, Beetroot, 3 types of Parsley, Sage, Rosemary, Thyme, Coriander, Peppermint, 4 types of lettuce, Rainbow Chard, Lemon Grass, Dill, Kaffir Lime & Lemon.

Processing your Harvest

Just like the old saying goes, there are many ways to skin a cat... and almost as many ways to clean your fish.
Whole fish with head on / head off, scaled whole, fillets....

I thought I would share my technique for a quick & clean fish cleaning.

Start with plenty of bench space on / near the sink, a nice sharp knife & a container handy for the innards & heads.

Give the fish a quick wash down as this removes most of the body slime and makes it a little easier to handle safely.
Start you first cut from the vent and slice up the belly to the chest, cut from vet to rear of belly also.


Place tip of knife near the lower edge of the gills & above pelvic fins. Pierce down through the whole body and cut cleanly behind the pelvic fin.

Flip the fish over and place tip of knife behind the gill covers & above the pectoral fin. Cut down through the back bone to the top of the head.


At this stage wedge your fingers into this cut to slightly separate the head.
Hold fish over your waste container and  finish the cut to sever the head from the body, most of the innards will simply fall out attached to the head.

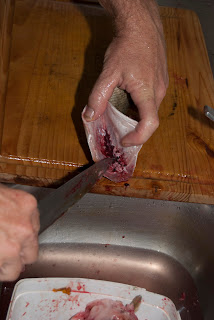
Use your knife to scrape away remaining loose innards.

Inside the body cavity you will see the swim bladder attached along the backbone.
Gently cut & scrape along the backbone to help loosen the swim bladder lining away.

Pull away remaining lining and repeat as needed to remove the final bits.

One final rinse and Presto !
Phew.... 6 down & 16 to go !

As silver perch have very small scales I did not bother to scale the fish. If you wish to scale your fish, that would probably be best done as step 1.